
 I’ve learned to knit when I was a child from my grandma, I’ve learned how to cast on, the knit stitch, the purl stitch and how to cast off. Since then I’ve learned by my self, I’ve read and I’ve watched many chart patterns and pictures until I’ve succeeded to understand what most of the symbols means. At first I didn’t watch YouTube videos, actually I hated them, but after a while I realized how good they are for learning new techniques and even new stitches. So I’ve learn to appreciate the video tutorials and even make my own too and I now I love video tutorials, to watch and make them.
The most I like to knit following charts and over time I was able to read the majority of the charts patterns. So I decided to share with you how to read all the symbols and how to knit them. You will see it’s very simple and once you understand, the charts pattern will be very simple to read it.
So today we’ll start with the basic stitches. If you know the symbol for the knit and purl stitches you will be able to make so many projects. There are so many patterns with only this two stitches. After you have learned how to knit the knit and purl stitches you can start to knit your first project: scarf, blankets, baby blankets. pillow covers, everything don’t need another techniques.
After you master these two stitches and you’ve made a few projects, the next step is to learn the increasing and decreasing techniques. I will show and explain this techniques in a future article. So keep an eye on the blog.
If you like to support my work as a crochet designer and support me to provide more free patterns and designs, buy me a cup of coffee:

The knit stitch:
You will find it in a chart represented by a vertical line or by a white box as you can see in the picture below.

Hold the needle filled with the cast on stitches in your left hand and the empty needle in your right hand. With the working yarn to the back *slide the right hand needle into the front of the first stitch on the left needle from left to right. Loop the working yarn under the right needle counterclockwise. Pull the wrapped yarn through the loop on the left needle sliding the old loop off the left needle and onto the right needle. Repeat from asterisk “*” for each loop on the left needle.
When you have knitted all the stitches off the left needle move the stitchfilled needle to your left hand and the empty needle to your right hand, re-adjusting the yarn, and you are ready for the next row of knitting.
If it’s easy for you to learn from a video, I’ve made a youtube tutorial, that you can see below, to show you how it’s done, just hit “play”.
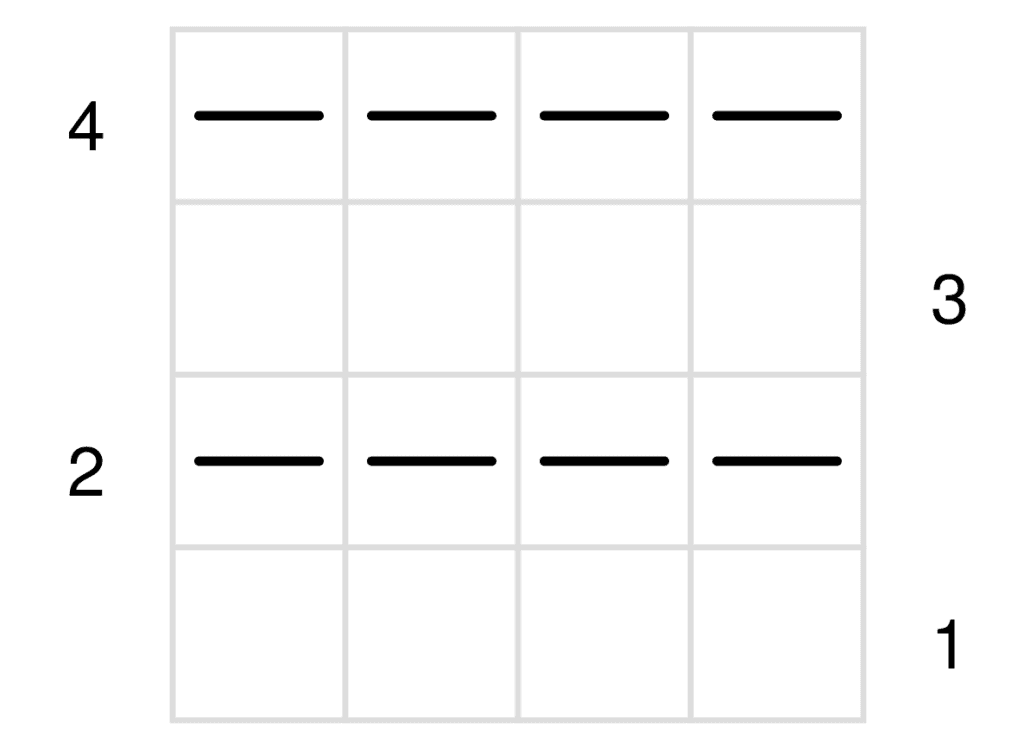
Purl stitch:
You will find it in a chart represented by a horizontal line as you can see in the picture below.

With the working yarn to the front, insert the right needle into the front of the first stitch on the left needle from right to left. Loop the yarn under and around the right needle counterclock wise. Pull the new loop through the loop on the left needle sliding the old loop off the needle. Repeat from the begining.
When you have purled all the stitches off the left needle move the stitchfilled needle to your left hand and the empty needle to your right hand, readjusting the yarn and you are ready for the next row of knitting.
If it’s easy for you to learn from a video, I’ve made a youtube tutorial, that you can see below, to show you how it’s done, just hit “play”.
This are the basic stitch in knitting, from this, all other stitches are created. This steps are the first concepts that you need to understand and practice so that you can progress to the many other possibilities knitting has to offer.
So next time when you will find this kind of chart you will know what it means:

Row 1: knit (k) al stitches;
Row 2: purl (p) all stitches;
Row 3: knit all stitches;
Roe 4: purl all stitches.

Row 1, 3, 7 (knitt all the odd rows- the right side): knit all stitches;
Row 2, 4, 6 (purl all the even rows- the wrong side): purl all stitches.
You will see that in many charts the wrong side doesnt appear, that means that you will purl all the stitches on the wrong side.
Row 1: knit (k) al stitches;
Row 2: purl (p) all stitches;
Row 3: knit all stitches;
Row 4: purl all stitches.
Alternate a knit row with a purl row you have the stockinette stitch (st st).
I hope this article is useful for you and for now on you will be able to read and knit from a chart pattern.
In the next article we will learn to read some patterns with different knit and purl combinations. You will see that if you know just 2 stitches you will be able to make so many beautiful things.
Follow this links and you will see what beautiful projects I’ve knitted with just this two stitches, all projects are beginner friendly:
4. Summer top;
Follow my Facebook and Instagram pages to see my current projects.
And Subscribe to my YouTube channel for my video tutorials: https://www.youtube.com/channel/UCUpzoP-RDaJV1_2kvJMh5QQ/videos
*Some links may be affiliate links which will allow me to make a small commission on any products purchased through my recommendation, this way, you help me sustain my work and help to provide free content. Please note that this does not influence my opinion or recommendations in any way.
Copyright 2019 Turquoise with vanilla. All right reserved. This pattern and photographs of items on this site are the property of Julia Bleau @Turquoisewithvanilla. Please DO NOT sell the pattern and claim this pattern as your own. The pattern is for personal use only and may not be translated or reproduced in another language. Please respect my rights, DO NOT share or publish this pattern anywhere without my permission. You can sell the items made with this pattern but please credit Turquoise with vanilla as the designer.


[…] in rounds only on the right side and has a knit one-stitch purl one-stitch rib, so if you only know how to knit the knit stitch and the purl stitch, this knitted sweater is perfect for you! The increase for this […]
I’m still learning from you, as I’m trying to achieve my goals. I certainly love reading everything that is posted on your website.Keep the tips coming. I loved it!
Thank you for your appreciation! I’m very happy I can help you :).