
If you are looking for how to crochet a granny square here I’m sure that you’ll find one that you love in this collection of 10 crochet granny square free patterns. I love granny squares, they are so versatile and can be used to make many items, so today I will show you a part of my granny squares collections.
I hope you will enjoy these beautiful patterns, they are very easy to crochet and if you are a beginner you should try it. A granny square is a fun and quick project to crochet. You can use them as coasters, you can sew them together and make a big project, some of them can be crochet in a big dimension so you can easily crochet a baby blanket, a lapghan, or a queen size blanket.
Here are some projects I’ve made using granny squares:
If you like to support my work as a crochet designer and support me to provide more free patterns and designs, buy me a cup of coffee:
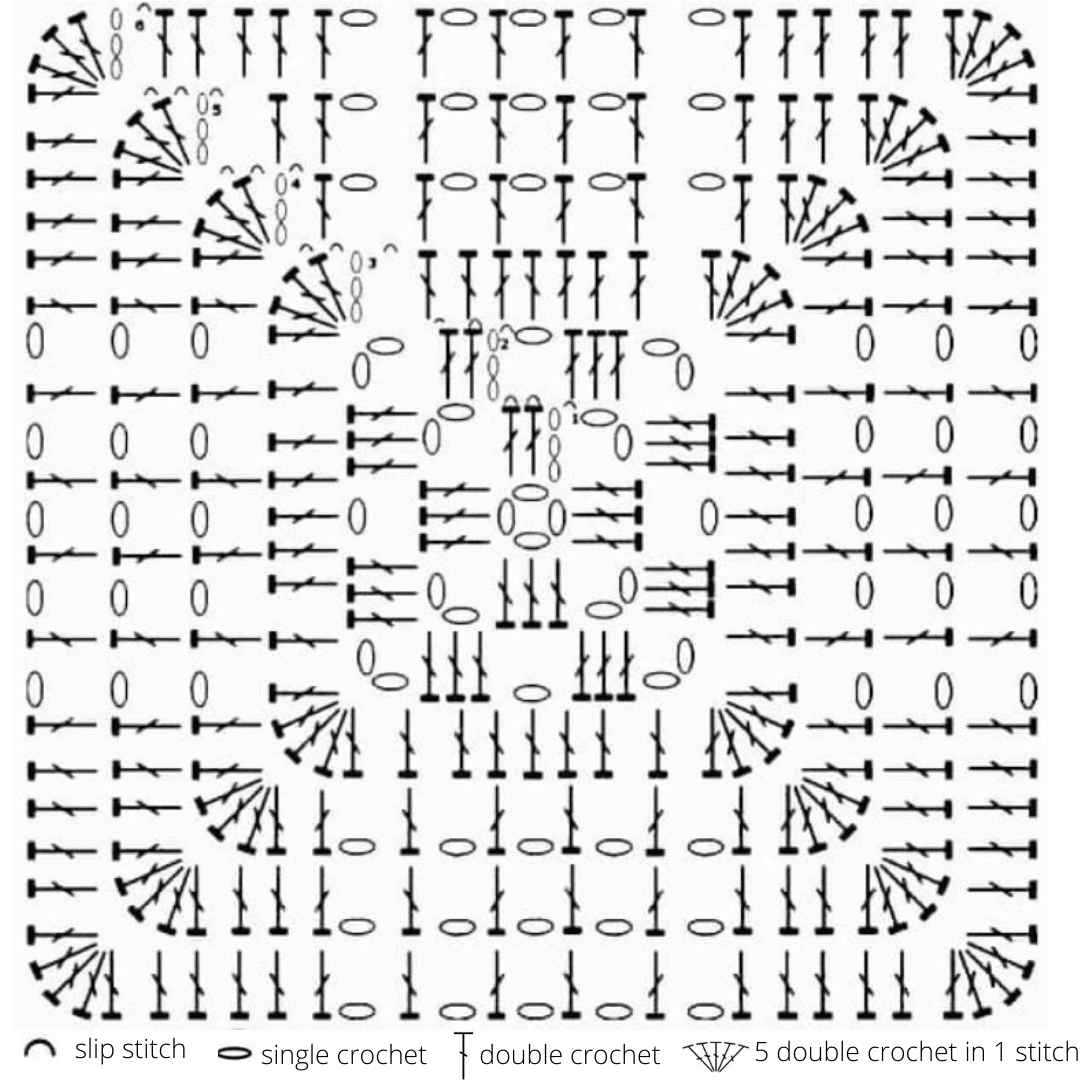
1. Granny square no. 1:
The chart:
The written pattern:
Start with a magic ring:
1. Round 1: ch 2 (count as a “dc”), 2 dc, 2 ch, * 3 dc, 2 ch*, repeat *-* 3 times; finish the round with 3 sl. sts ( one to close the round and two to go in the next “2 ch” space);
2. Round 2: ch 2 (count as a “dc”), 2 dc, 2 ch, 3 dc in the same space; ch, *in next space crochet: 3 dc, 2 ch, 3 dc, ch*. Repeat *-* until the end of the round; finish the round with 3 sl. sts ( one to close the round and two to go in the next “2 ch” space);
3. Round 3: ch 2 (count as a “dc”), 4 dc in the same space, 7 dc (3 dc in the 3 dc of the previous round, 1 dc in 1 ch space and 3 dc in next 3 dc of previous round); *5 dc in next “2 ch space”, 7 dc (3 dc in the 3 dc of the previous round, 1 dc in 1 ch space and 3 dc in next 3 dc of previous round)*. Repeat *-* until the end of the round. Finish the round with 2 sl. sts ( one to close the round and the 2nd to go in the 3rd dc crocheted in “2 ch” space);
4. Round 4: ch 2 (count as a “dc”), 4 dc in the same space, [1 dc in next dc of the previous round, ch, *skip “1 dc” of previous round, 1 dc, 1 ch*, repeat *-* 4 times; skip 1 dc of previous round, 1 dc, 5 dc in next st]; repeat [-] 3 times. 1 dc in next dc of the previous round, ch, *skip “1 dc” of previous round, 1 dc, 1 ch*, repeat *-* 4 times; skip 1 dc of previous round, 1 dc. Finish the round with 2 sl. sts ( one to close the round and the 2nd to go in the 3rd dc crocheted in “2 ch” space);
5. Round 5: ch 2 (count as a “dc”), 4 dc in the same space, [3 dc in next “3 dc” of previous round, ch, * 1 dc, 1 ch in next “1 dc” of previous round*, repeat *-* 4 times; 3 dc in next “3 dc” of previous round, 5 dc in next st]; repeat [-] 3 times. 3 dc in next “3 dc” of previous round, ch, * 1 dc, 1 ch in next “1 dc” of previous round*, repeat *-* 4 times; 3 dc in next “3 dc” of the previous round. Finish the round with 2 sl. sts ( one to close the round and the 2nd to go in the 3rd dc crocheted in “2 ch” space);
6. Round 6: ch 2 (count as a “dc”), 4 dc in the same space, [1 dc in each next “5 dc” of previous round, ch, *1 dc, 1 ch in next “1 dc of previous round*, repeat *-* 4 times; 1 dc in each next 5 sts of previous round, 5 dc in next st]; repeat [-] 3 times. Dc in each next “5 dc” of previous round, ch, *1 dc, 1 ch in next 1 dc of previous round*, repeat *-* 4 times; dc in each next 5 dc of the previous round. Finish the round with a sl.st.
The Video Tutorial:
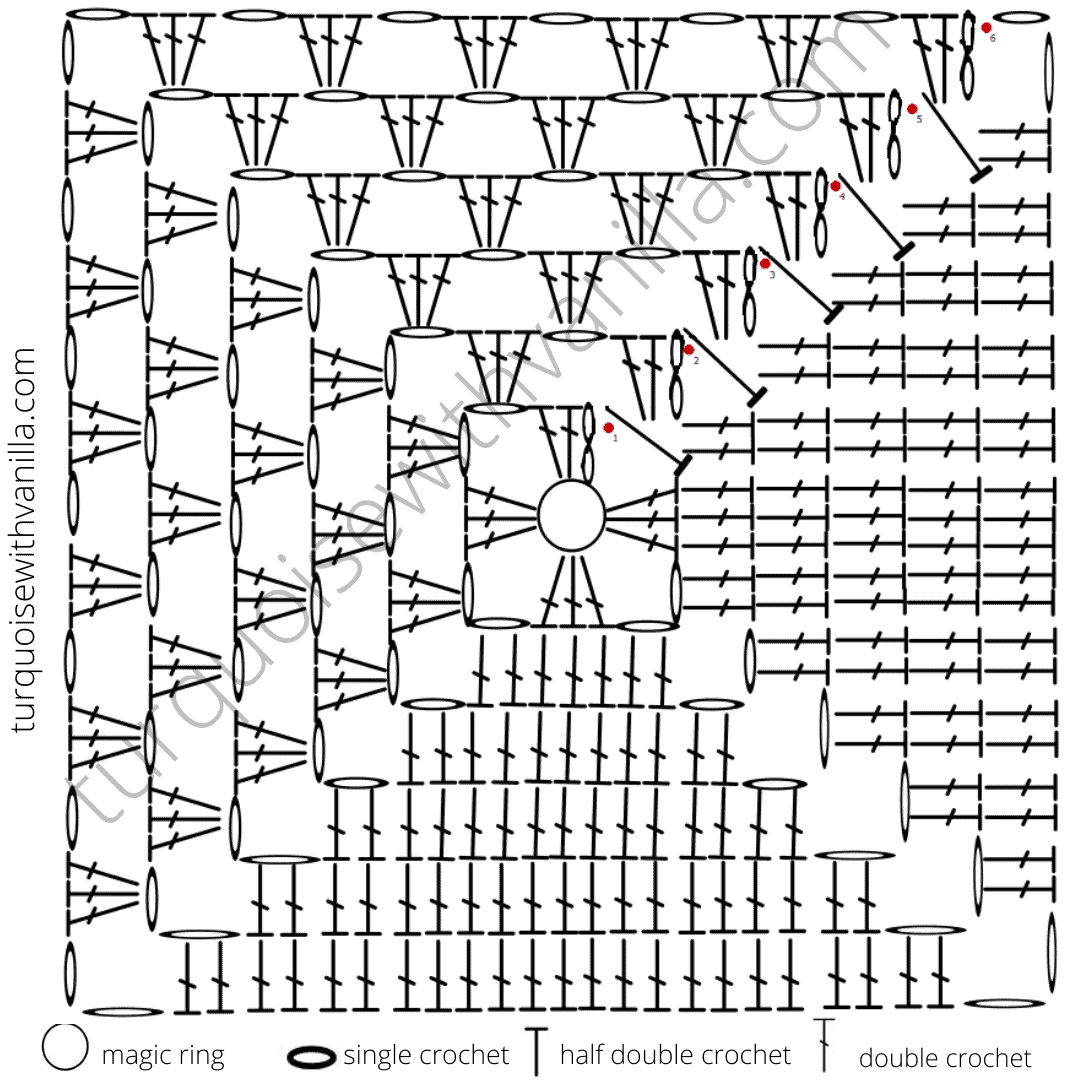
2. Granny square no. 2:
The chart:
The written pattern:
Start with a magic ring:
1. Round 1: ch 2 (count as a “dc”), 2 dc, 2 ch, *3 dc, 2 ch*, repeat *-* 2 more times; hdc to close the round- this hdc will create a space in which you’ll start the round 2. You should have 3 dc for every side of the square.
2. Round 2: ch 2 (count as a “dc”), 2 dc, ch; in next chain space crochet: 3 dc, 2 ch, 3 dc; ch 1. In next chain space crochet 3 dc, 2 ch, 2 dc. Crochet 1 dc in each dc of the previous round (3 dc in total). In next chain space crochet 2 dc, 2 ch, 2 dc. Crochet 1 dc in each dc of the previous round (3 dc in total); 2 dc in next space (in the space you’ve started the round); hdc to close the round- this hdc will create a space in which you’ll start the next round.
3. Round 3: ch 2 (count as a “dc”), 2 dc, ch; *in next chain space crochet: 3 dc, ch*. In next chain space crochet: 3 dc, 2 ch, 3 dc; ch 1. Repeat *-*. In next chain space crochet 3 dc, 2 ch, 2 dc. Crochet 1 dc in each dc of the previous round (7 dc in total). In next chain space crochet 2 dc, 2 ch, 2 dc. Crochet 1 dc in each dc of the previous round (7 dc in total); 2 dc in next space (in the space you’ve started the round); hdc to close the round- this hdc will create a space in which you’ll start the next round.
4. Round 4: ch 2 (count as a “dc”), 2 dc, ch; *in next chain space crochet: 3 dc, ch*. Repeat *-* for the next chain space. In next chain space crochet: 3 dc, 2 ch, 3 dc; ch 1. Repeat *-* from the next 2 chain spaces. In next chain space crochet 3 dc, 2 ch, 2 dc. Crochet 1 dc in each dc of the previous round (11 dc in total). In next chain space crochet 2 dc, 2 ch, 2 dc. Crochet 1 dc in each dc of the previous round (11 dc in total); 2 dc in next space (in the space you’ve started the round); hdc to close the round- this hdc will create a space in which you’ll start the next round.
5. Round 5: ch 2 (count as a “dc”), 2 dc, ch; *in next chain space crochet: 3 dc, ch*. Repeat *-* for the next 2 chain spaces. In next chain space crochet: 3 dc, 2 ch, 3 dc; ch 1. Repeat *-* from the next 3 chain spaces. In next chain space crochet 3 dc, 2 ch, 2 dc. Crochet 1 dc in each dc of the previous round (15 dc in total). In next chain space crochet 2 dc, 2 ch, 2 dc. Crochet 1 dc in each dc of the previous round (15 dc in total); 2 dc in next space (in the space you’ve started the round); hdc to close the round- this hdc will create a space in which you’ll start the next round.
6. Round 6: ch 2 (count as a “dc”), 2 dc, ch; *in next chain space crochet: 3 dc, ch*. Repeat *-* for the next chain spaces. In next chain space crochet: 3 dc, 2 ch, 3 dc; ch 1. Repeat *-* from the next 4 chain spaces. In next chain space crochet 3 dc, 2 ch, 2 dc. Crochet 1 dc in each dc of the previous round (19 dc in total). In next chain space crochet 2 dc, 2 ch, 2 dc. Crochet 1 dc in each dc of the previous round (19 dc in total); 2 dc in next space (in the space you’ve started the round); ch 2, slip stitch to close the round.
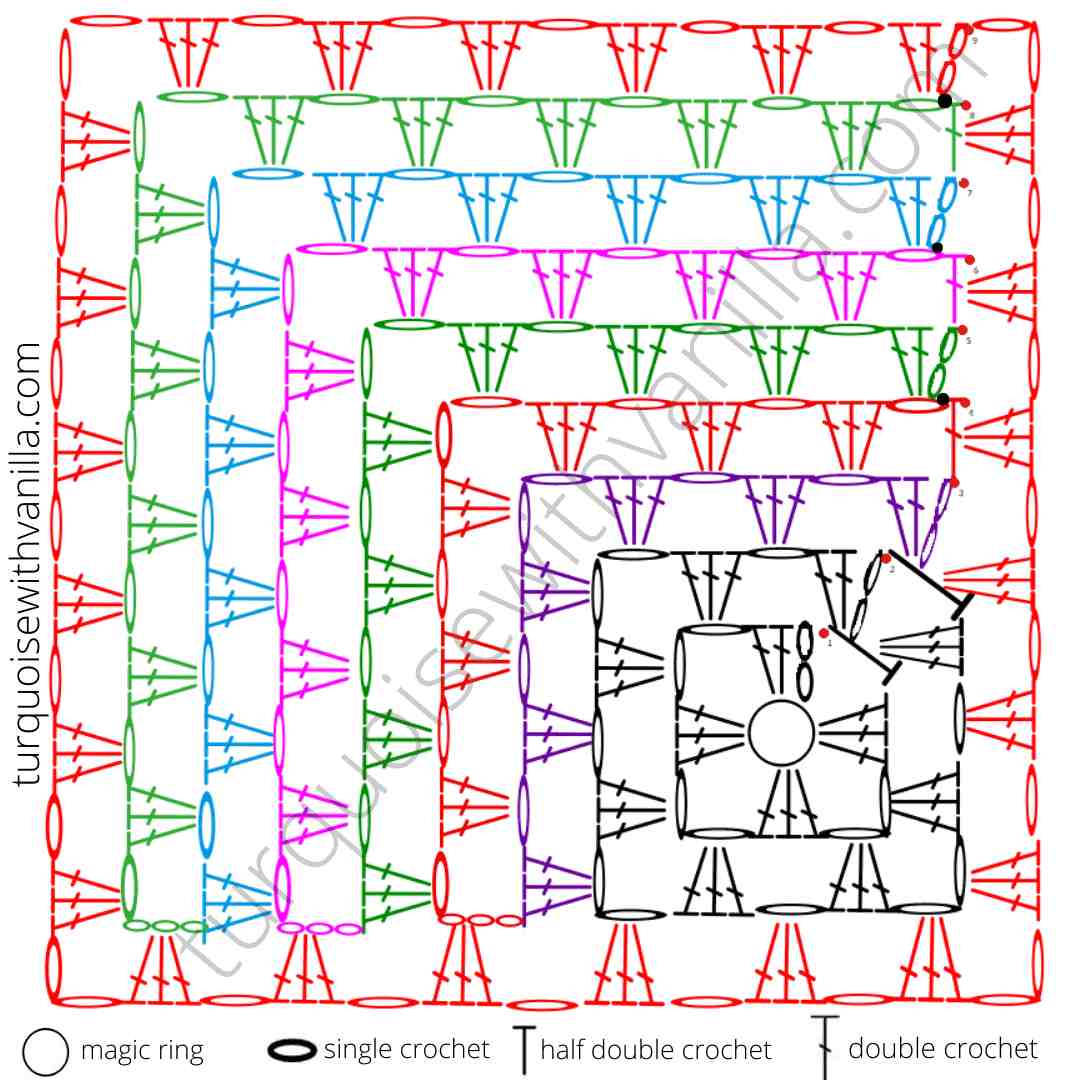
3. Granny square no. 3:
The chart:
The written pattern:
Start with a magic ring:
1. Round 1: ch 2 (count as a “dc”), 2 dc, 2 ch, *3 dc, 2 ch*, repeat *-* 2 more times; hdc to close the round- this hdc will create a space in which you’ll start the round 2. You should have 3 dc for every side of the square.
2. Round 2: ch 2 (count as a “dc”), 2 dc, ch 1, *in next ch space crochet (3 dc, 2 ch, 3 dc); ch 1*; repeat *-* 2 more times; 3 dc in the hdc space; hdc to close the round- this hdc will create a space in which you’ll start the round. After this round, you’ll crochet the square in rows (you’ll crochet only two sides of the granny square).
3. Row 3: ch 2 (count as a “dc”), 2 dc, ch 1; in next ch space: 3 dc, ch 1; in next ch space: (3 dc, ch 2, 3 dc); ch 1; in next ch space: (3 dc, ch 1); in next ch space: 3 dc.
4. Row 4: ch 4; *in next ch space: (3 dc, ch 1); in next ch space: (3 dc, ch 1)*; in next ch space: (3 dc, ch 2, 3 dc); ch 1; repeat *-*; dc in the second ch of the “ch 2” of the previous row.
5. Row 5: sl. st. to reach the ch space and in this space crochet: ch 2 (count as a “dc”), 2 dc, ch 1; *in next ch space: (3 dc, ch 1)*; repeat *-* for the next ch space. In next ch space: (3 dc, ch 2, 3 dc); ch 1. Repeat *-* for the next 2 ch spaces; 3 dc in the “ch 4” space.
6. Row 6: ch 4; *in next ch space: (3 dc, ch 1)*; repeat *-* for the next 2 ch spaces. In next ch space: (3 dc, ch 2, 3 dc); ch 1.
Repeat *-* for the next 3 ch spaces; dc in the second ch of the “ch 2” of the previous row.
7. Row 7: sl. st. to reach the ch space and in this space crochet: ch 2 (count as a “dc”), 2 dc, ch 1; *in next ch space: (3 dc, ch 1)*; repeat *-* for the next 2 ch spaces. In next ch space: (3 dc, ch 2, 3 dc); ch 1. Repeat *-* for the next 3 ch spaces; 3 dc in the “ch 4” space.
8. Row 8: ch 4; *in next ch space: (3 dc, ch 1)*; repeat *-* for the next 3 ch spaces. In next ch space: (3 dc, ch 2, 3 dc); ch 1.
Repeat *-* for the next 4 ch spaces; dc in the second ch of the “ch 2” of the previous row.
Next, you’ll crochet in rounds.
9. Round 9: sl. st. to reach the ch space and in this space crochet: ch 2 (count as a “dc”), 2 dc, ch 1; *in next ch space: (3 dc, ch 1)*; repeat *-* for the next 3 ch spaces. In next ch space: (3 dc, ch 2, 3 dc); ch 1. Repeat *-* for the next 4 ch spaces. In the ch 4 space of the previous round crochet: (3 dc, ch 2, 3 dc); ch 1. Repeat *-* for the next 4 ch spaces (the first 2 ch spaces are made from 4 ch, the 3rd chain space is made from 2 ch, and the last chain space is made from 1ch). In next ch space: (3 dc, ch 2, 3 dc); ch 1. For the next ch space crochet: (3 dc, ch 1). Next, you’ll crochet (3 dc, ch 1) in the space made from the hdc of the second round. Next, you’ll crochet (3 dc, ch 1) in the space made from the dc of row 4. Crochet (3 dc, ch 1) in the space made from dc of row 6 and 8; ch 2; sl st to close the round.
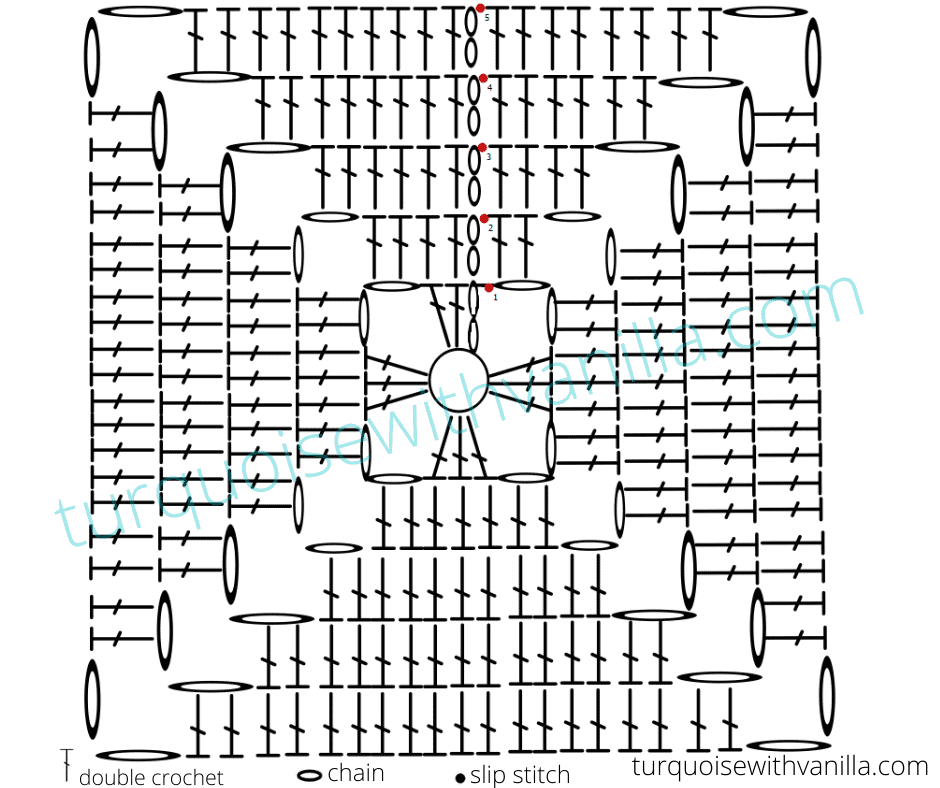
4. Granny square no. 4:
The chart:
The written pattern:
Start with a magic ring:
1. Round 1: ch 2 (count as a “dc”), 2 dc, 2 ch, *3 dc, 2 ch*, repeat *-* 2 more times. Sl. st to close the round. You should have 3 dc for every side of the square.
2. Round 2: ch 2 (count as a “dc”), 4 dc (first 2 dc in next 2 dc- 1 dc for every dc of the previous round- and the next 2 dc in ch space), 2 ch; *7 dc (first 2 dc in the same ch space as the previous sts, next 3 dc in the 3 dc of the previous round- make 1 dc in every dc-, 6th and 7th dc in next ch space), ch 2*; repeat *-* 2 more times; 2 dc in same ch space as the previous sts. Sl. st to close the round. You should have 7 dc for every side of the square.
3. Round 3: ch 2 (count as a “dc”), 6 dc (first 4 dc in next 4 dc of the previous round- 1 dc for every dc of the previous round- and the next 2 dc in ch space), 2 ch; *11 dc (first 2 dc in the same ch space as the previous sts, next 7 dc in the 7 dc of the previous round- make 1 dc in every dc of the previous round-, last 2 dc in next ch space), ch 2*; repeat *-* 2 more times; 4 dc (first 2 dc in the same ch space as the previous sts and 2 dc in the 2 dc of the previous round- 1 dc for every dc of the previous round). Sl. st to close the round. You should have 11 dc for every side of the square.
4. Round 4: ch 2 (count as a “dc”), 8 dc (first 6 dc in next 6 dc of the previous round- 1 dc for every dc of the previous round- and the next 2 dc in ch space), 2 ch; *15 dc (first 2 dc in the same ch space as the previous sts, next 11 dc in the 11 dc of the previous round- make 1 dc in every dc of the previous round-, last 2 dc in next ch space), ch 2*; repeat *-* 2 more times; 6 dc (first 2 dc in the same ch space as the previous sts and 4 dc in the next 4 dc of the previous round- 1 dc for every dc of the previous round). Sl. st to close the round. You should have 15 dc for every side of the square.
5. Round 5: ch 2 (count as a “dc”), 10 dc (first 8 dc in next 8 dc of the previous round- 1 dc for every dc of the previous round- and the next 2 dc in ch space), 2 ch; *19 dc (first 2 dc in the same ch space as the previous sts, next 15 dc in the 15 dc of the previous round- make 1 dc in every dc of the previous round-, last 2 dc in next ch space), ch 2*; repeat *-* 2 more times; 8 dc (first 2 dc in the same ch space as the previous sts and 6 dc in the next 6 dc of the previous round- 1 dc for every dc of the previous round). Sl. st to close the round. You should have 19 dc for every side of the square.
5. Granny square no. 5:
The chart:
The written pattern:
Start with a magic ring:
1. Round 1: ch 4 (count as a “dc” the first 2 ch), * 3 dc, 2 ch*, repeat *-* 2 more times; 2 dc. Sl. st to close the round, sl. st in next ch space.
2. Round 2: ch 4 (count as a “dc” the first 2 ch); *3 dc in the same ch space, 1 ch, 3 dc in next ch space, 2 ch* repeat *-* 2 more times; 3 dc in the same ch space, 1 ch, 2 dc in next ch space. Sl. st to close the round, sl. st in next ch space.
3. Round 3: ch 4 (count as a “dc” the first 2 ch); *3 dc in the same ch space, 1 ch, 3 dc in next ch space, 1 ch, 3 dc in next ch space, 2 ch*; repeat *-* 2 more times; 3 dc in the same ch space, 1 ch, 3 dc in next ch space, 1 ch, 2 dc in next ch space. Sl. st to close the round, sl. st in next ch space.
4. Round 4: ch 4 (count as a “dc” the first 2 ch); *3 dc in the same ch space, 1 ch, 3 dc in next ch space, 1 ch, 3 dc in next ch space, 1 ch, 3 dc in next ch space, 2 ch*. Repeat *-* 2 more times; 3 dc in the same ch space, 1 ch, 3 dc in next ch space, 1 ch, 3 dc in next ch space,1 ch, 2 dc in next ch space. Sl. st to close the round, sl. st in next ch space.
5. Round 5: ch 4 (count as a “dc” the first 2 ch); *3 dc in the same ch space, 1 ch, 3 dc in next ch space, 1 ch, 3 dc in next ch space, 1 ch, 3 dc in next ch space, 1 ch, 3 dc in next ch space, 2 ch*. Repeat *-* 2 more times; 3 dc in the same ch space, 1 ch, 3 dc in next ch space, 1 ch, 3 dc in next ch space,1 ch, 3 dc in next ch space,1 ch, 2 dc in next ch space. Sl. st to close the round, sl. st in next ch space.
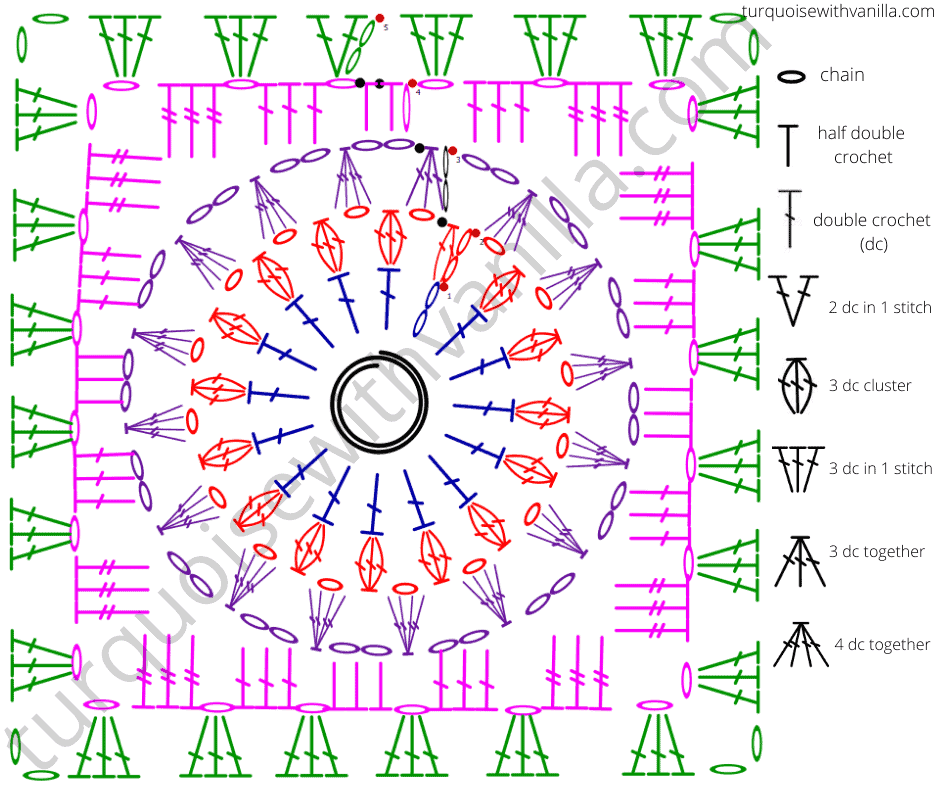
6. Granny square no.6:
The chart:
The written pattern:
Start with a magic ring:
1. Round 1: ch 2 (count as a dc), crochet 15 double crochet, slip stitch to close the round.
2. Round 2: ch 2 (count as a dc), dc in the same stitch. Crochet 2 dc in every stitch of the previous round, slip stitch to close the round, you should have 32 double crochet stitches.
3. Round 3: ch 1 (don’t count as a stitch), sc in the same stitch, ch 3, *skip 1 stitch and crochet a sc, ch 3*. Repeat *-* until the end of the round (you should have 16 ch spaces). Slip stitch to close the round and another slip stitch to go in the next ch space, where you’ll start the next round.
4. Round 4:ch 2 (count as a dc), 2 dc in the same ch space, * 3 dc in next ch space*. Repeat *-* until the end of the round, you should have 48 dc ( three double crochet stitches for every ch space). Slip stitch to close the round.
5. Round 5: ch 1 (don’t count as a stitch), sc in the same stitch, ch 3, *skip 1 stitch and crochet a sc, ch 3*. Repeat *-* until the end of the round (you should have 24 ch spaces). Slip stitch to close the round.
6. Round 6: crochet another slip stitch to go in the next ch space and start the round from here: ch 1 (don’t count as a stitch), 2 sc in ch space, crochet 2 sc in every next 2 ch spaces, 3 dc in next ch space. In next ch space crochet: 2 treble crochet, ch, 1 double treble crochet, ch, 2 treble crochet. 3 dc in next ch space. * Crochet 2 sc in every next 3 ch spaces, 3 dc in next ch space. In next ch space crochet: 2 treble crochet, ch, 1 double treble crochet, ch, 2 treble crochet. 3 dc in next ch space*. Repeat *-* two more times. Slip stitch to close the round.
7. Round 7: ch 2 (count as a dc), dc in the same stitch and crochet 10 dc ( 1 dc in every next 10 stitches); *dc in the ch space, 3 dc in next stitch (in the double treble crochet of the previous round), dc in the ch space, 16 dc (1 dc in every next 16 stitches)*. Repeat *-* two more times. Dc in the ch space, 3 dc in the next stitch (in the double treble crochet of the previous round), dc in the ch space, 5 dc (1 dc in every next 5 stitches).
Slip stitch to close the round.
7. Granny square no. 7:
The chart:
The written pattern:
Start with a magic ring:
1. Round 1: ch 2 (don’t count as a dc), crochet 16 double crochet, slip stitch to close the round.
2. Round 2: ch 2 (count as a dc), dc in the same stitch, ch; *crochet 2 dc tog in next stitch, ch*. Repeat *-* until the end of the round. Slip stitch to close the round, slip stitch to go in next ch space.
3. Round 3: ch 2 (count as a dc), 2 dc tog in the same ch space, ch 2; *Crochet in next ch space: 3 dc tog, ch 2*. Repeat *-* until the end of the round. Slip stitch to close the round.
4. Round 4: ch (don’t count as a stitch), 3 sc in the same ch space, ch. In next ch space crochet 3 hdc, ch and in *next ch space crochet: 3 dc, 2 ch, 3 dc, ch. In next ch space crochet 3 hdc, ch and in next ch space crochet 3 sc, ch; crochet in next ch space 3hdc, ch*. Repeat *-* 2 more times. In next ch space crochet: 3 dc, 2 ch, 3 dc, ch, and 3 hdc in next ch space. Finish with a hdc in the first ch of the round to close the round, in this space, you’ll start the next round.
5. Round 5: ch 2 (count as a dc), 2 dc in the same space. *In next ch space crochet 3 dc*, repeat *-* in every 1 ch space of the previous round, and for the 2 ch space (the corners) crochet: 3 dc, ch, 3 dc. Close the round with a slip stitch and crochet 2 more slip stitches to go between the 3rd and the 4th dc of the previous round (don’t forget to count first ch as a dc) and from here you’ll start the next round.
6. ch 2 (count as a dc), 2 dc in the same stitch. *Skip 3 dc and crochet 3 dc between the previous 3dc and the next 3 dc made in the same ch*. Repeat *-* and for each 2 ch space crochet: 3 dc, ch, 3 dc. Finish with a slip stitch to close the round.
8. Granny square no. 8:
The chart:
The written pattern:
Start with a magic ring:
1. Round 1: ch 2 (don’t count as a dc), crochet 16 double crochet, slip stitch to close the round.
2. Round 2: ch 2 (count as a dc), 2 dc tog in the same stitch, ch; *crochet 3 dc cluster in next stitch, ch*. Repeat *-* until the end of the round. Slip stitch to close the round, slip stitch to go in next ch space.
3. Round 3: ch 2 (count as a dc), 3 dc tog in the same stitch, ch 2; *crochet 4 dc tog in next stitch, ch 2*. Repeat *-* until the end of the round. Slip stitch to close the round, slip stitch to go in next ch space.
4. Round 4: ch (count as a st), 2 hdc in the same stitch, ch, *crochet 3 dc in next ch space, ch; in next ch space crochet: 3 treble crochet, ch 2, 3 treble crochet, ch; 3 dc in next ch space, ch, 3 hdc in next ch space, ch*. Repeat *-* 2 more times. Continue to crochet 3 dc in next ch space, ch; in next ch space crochet: 3 treble crochet, ch 2, 3 treble crochet, ch; 3 dc in next ch space, ch. Slip stitch to close the round, slip stitches to go in next ch space.
5. Round 5: ch 2 (count as a dc), 2 dc in the same stitch; *crochet 3 dc in next ch space; in next ch space crochet: 3 double crochet, ch 2, 3 double crochet, 3 double crochet in every next 3 ch spaces*. Repeat *-* 2 more times. Continue to crochet 3 dc in next ch space; in next ch space crochet: 3 double crochet, ch 2, 3 double crochet, 3 double crochet in every next 2 ch spaces. Slip stitch to close the round.
9. Granny square no. 9:
The chart:
The written pattern:
Start with a magic ring:
1. Round 1: ch 2 (don’t count as a dc), crochet 12 double crochet, slip stitch to close the round.
2. Round 2: ch 2 (count as a dc), 2 dc tog in the same stitch, ch 2 ; *crochet 3 dc tog in next stitch, ch 2*. Repeat *-* until the end of the round. Slip stitch to close the round, slip stitch to go in next ch space.
3. Round 3: ch (don’t count as a st), sc in the same ch space; *Crochet in next ch space: 4 dc, ch 3, 4 dc*, sc in next ch space, ch3, sc in next ch space. Repeat *-* 3 more times. Slip stitch to close the round, slip stitch to go in next ch space.
4. Round 4: ch 2 (count as a dc), 3 dc in the same ch space, ch 3, 4 dc in the same ch space; ch, 4 dc in next ch space, ch. *In next ch space crochet: 4 dc, ch 3, 4 dc; ch, 4 dc in next ch space, ch*. Repeat *-* 2 more times. Slip stitch to close the round, slip stitch to go in next ch space.
5. Round 5: ch 2 (count as a dc), 3 dc in the same ch space, ch 3, 4 dc in the same ch space; 4 dc in every next 2 ch spaces.*In next ch space crochet: 4 dc, ch 3, 4 dc; 4 dc in every next 2 ch spaces. Repeat *-* 2 more times. Slip stitch to close the round.
Cut the yarn and weave in the ends.
10. Granny square no. 10:
The chart:
These are a few of my favorite granny squares, I hope you like it too.
Projects made using these granny squares:
Feel free to tag me when you share your project on Instagram or Facebook, or you can use the hashtag #turquoisewithvanilla.
Follow my Facebook and Instagram pages to see my current projects.
And Subscribe to my YouTube channel for my video tutorials: https://www.youtube.com/channel/UCUpzoP-RDaJV1_2kvJMh5QQ/videos
Happy crocheting girls!
Copyright Turquoise with vanilla. All right reserved. This pattern and photographs of items on this site are property of Julia Bleau @Turquoisewithvanilla. Please DO NOT sell the pattern and claim this pattern as your own. The pattern is for personal use only and may not be translated or reproduced in another language. Please respect my rights, DO NOT share or publish this pattern anywhere without my permission. You can sell the items made with this pattern but please credit Turquoise with vanilla as the designer.





[…] mm (M hook), I decided to make a continuous granny square. I found a simple design that I liked at this site. I selected number of 4 (of […]
Are there pictures of the completed squares?
Pls teach me to read the symbols. I can easily follow the video but I don’t really know how to read the chart with symbols. Need to learn more the symbols.
Where can I find the written patterns? I don’t do well with charts.
I didn’t make the written patterns, here you find just the charts.
How many ch stitches are in the centre ring of pattern 8 please?
Hello, it’s a magic ring/magic circle.
I am a beginner and don’t know how many to chain to begin pattern. I printed out all patterns but don’t know how to start them. Could you please tell me.
For me is much easier to start with a magic ring, even for the granny squares with chains for the beginning.
Thank you very much.
You’re welcome!
Thanks for sharing these patterns. I love them all.
You’re welcome, thank you for your appreciation.
Very beautiful & useful for beginner’s thanks
Thank you!
I am a beginner and would like to have seen them a little darker and the color blue I can barely see. Granny square is my favorite.
Nice
Thank you!
I love that you put graphs instead of videos! I am old school and understand these 😉
I really would have loved to see them worked up in your color choice!
Thank you! I prefer charts too.
I like no 3 is it easy to done
Yes, is very beautiful.