
The Deep Forest crochet scarf is an ideal project for beginners and a nod to the principles of slow fashion, this scarf not only serves as a chic accessory but also features an easy-to-crochet pattern. As a crochet enthusiast, I often look for patterns that balance simplicity and elegance, and the Deep Forest Crochet Scarf does just that. I designed this pattern with beginners in mind, this scarf uses basic stitches and techniques to ensure that even those new to crocheting can begin to create their wearable masterpiece. The Deep Forest Crochet Scarf pattern is thoughtfully designed to be easy to follow. With a combination of basic stitches such as chain stitch, single crochet, and double crochet, beginners can confidently pick up their crochet hooks and begin this project. Step-by-step instructions guide them through the process for a seamless and enjoyable experience.
One of the key features of this crochet scarf pattern is its efficiency. The quick and easy pattern allows crocheters to see tangible results in a short amount of time. Whether you’re a seasoned pro looking for a quick project or a beginner eager to see your creation come to life, the Deep Forest Crochet Scarf provides a satisfying and quick crafting experience.
The Deep Forest Crochet Scarf is a versatile and chic accessory that can enhance any outfit beyond its ease of creation. The deep, earthy tones mimic the enchanting hues of a forest, adding a touch of nature-inspired sophistication to your wardrobe. Whether you pair it with a casual sweater or drape it over an elegant dress, this scarf will effortlessly complement a variety of styles.
The Deep Forest crochet scarf is the perfect example of how simple stitches and basic techniques can make such a beautiful, chic, and elaborate finished piece that is hard to believe a beginner could crochet. This project is perfect for a beginner not only because it’s easy to crochet it but because after you see it finished you will have the feeling that you’re crochet skills are improving and you can do this!
Crocheting the Deep Forest Crochet Scarf is a labor of love. Every stitch is infused with the crocheter’s dedication and passion for the art of crochet. This scarf becomes more than an accessory; it becomes a symbol of craftsmanship and the unique connection between creator and creation.
The Deep Forest Crochet Scarf seamlessly weaves together the threads of simplicity, elegance, and sustainability. Its easy-to-crochet pattern makes it accessible to beginners, while its chic design ensures that experienced crocheters will find joy in the creative process. A nod to slow fashion, this scarf encourages a mindful approach to making and wearing accessories, promoting a sustainable and stylish lifestyle. With the Deep Forest Crochet Scarf, every stitch tells a story of craftsmanship, individuality, and a commitment to a more sustainable and beautiful world.
For my scarf, I’ve used Classic DK 100% acrylic 300 g (100= 385m/ 3.53= 311 yards) and a 4 mm hook.
This yarn is a soft yarn with great airy volume, suitable for crochet and knitting projects. It is made from 100% high-quality acrylic and comes in a beautiful selection of colors. Whether you knit or crochet with this yarn, the stitches will stand out nicely and clearly. If you are allergic to wool or don’t want to use animal fibers, you can substitute this great acrylic yarn for a soft and lovely result. The soft yarn is great for many creative, colorful projects. It does not scratch and is comfortable to work with and wear on the body. You can purchase this great yarn HERE.
Buy me a cup of coffee if you want to support my work as a crochet and knitting designer and help me to provide more free patterns and designs:

Printable version for purchase HERE.
The final size of the Deep Forest crochet scarf is 145 cm/57 inches wingspan and 74 cm/29 inches depth from the center.
Abbreviations:
ch= chain;
st= stitch;sts= stitches;
sc= single crochet;
dc= double crochet;
tc= treble crochet;
dc cross= double crochet cross.
The pattern uses US crochet terminology.

The chart for the Deep Forest crochet scarf:
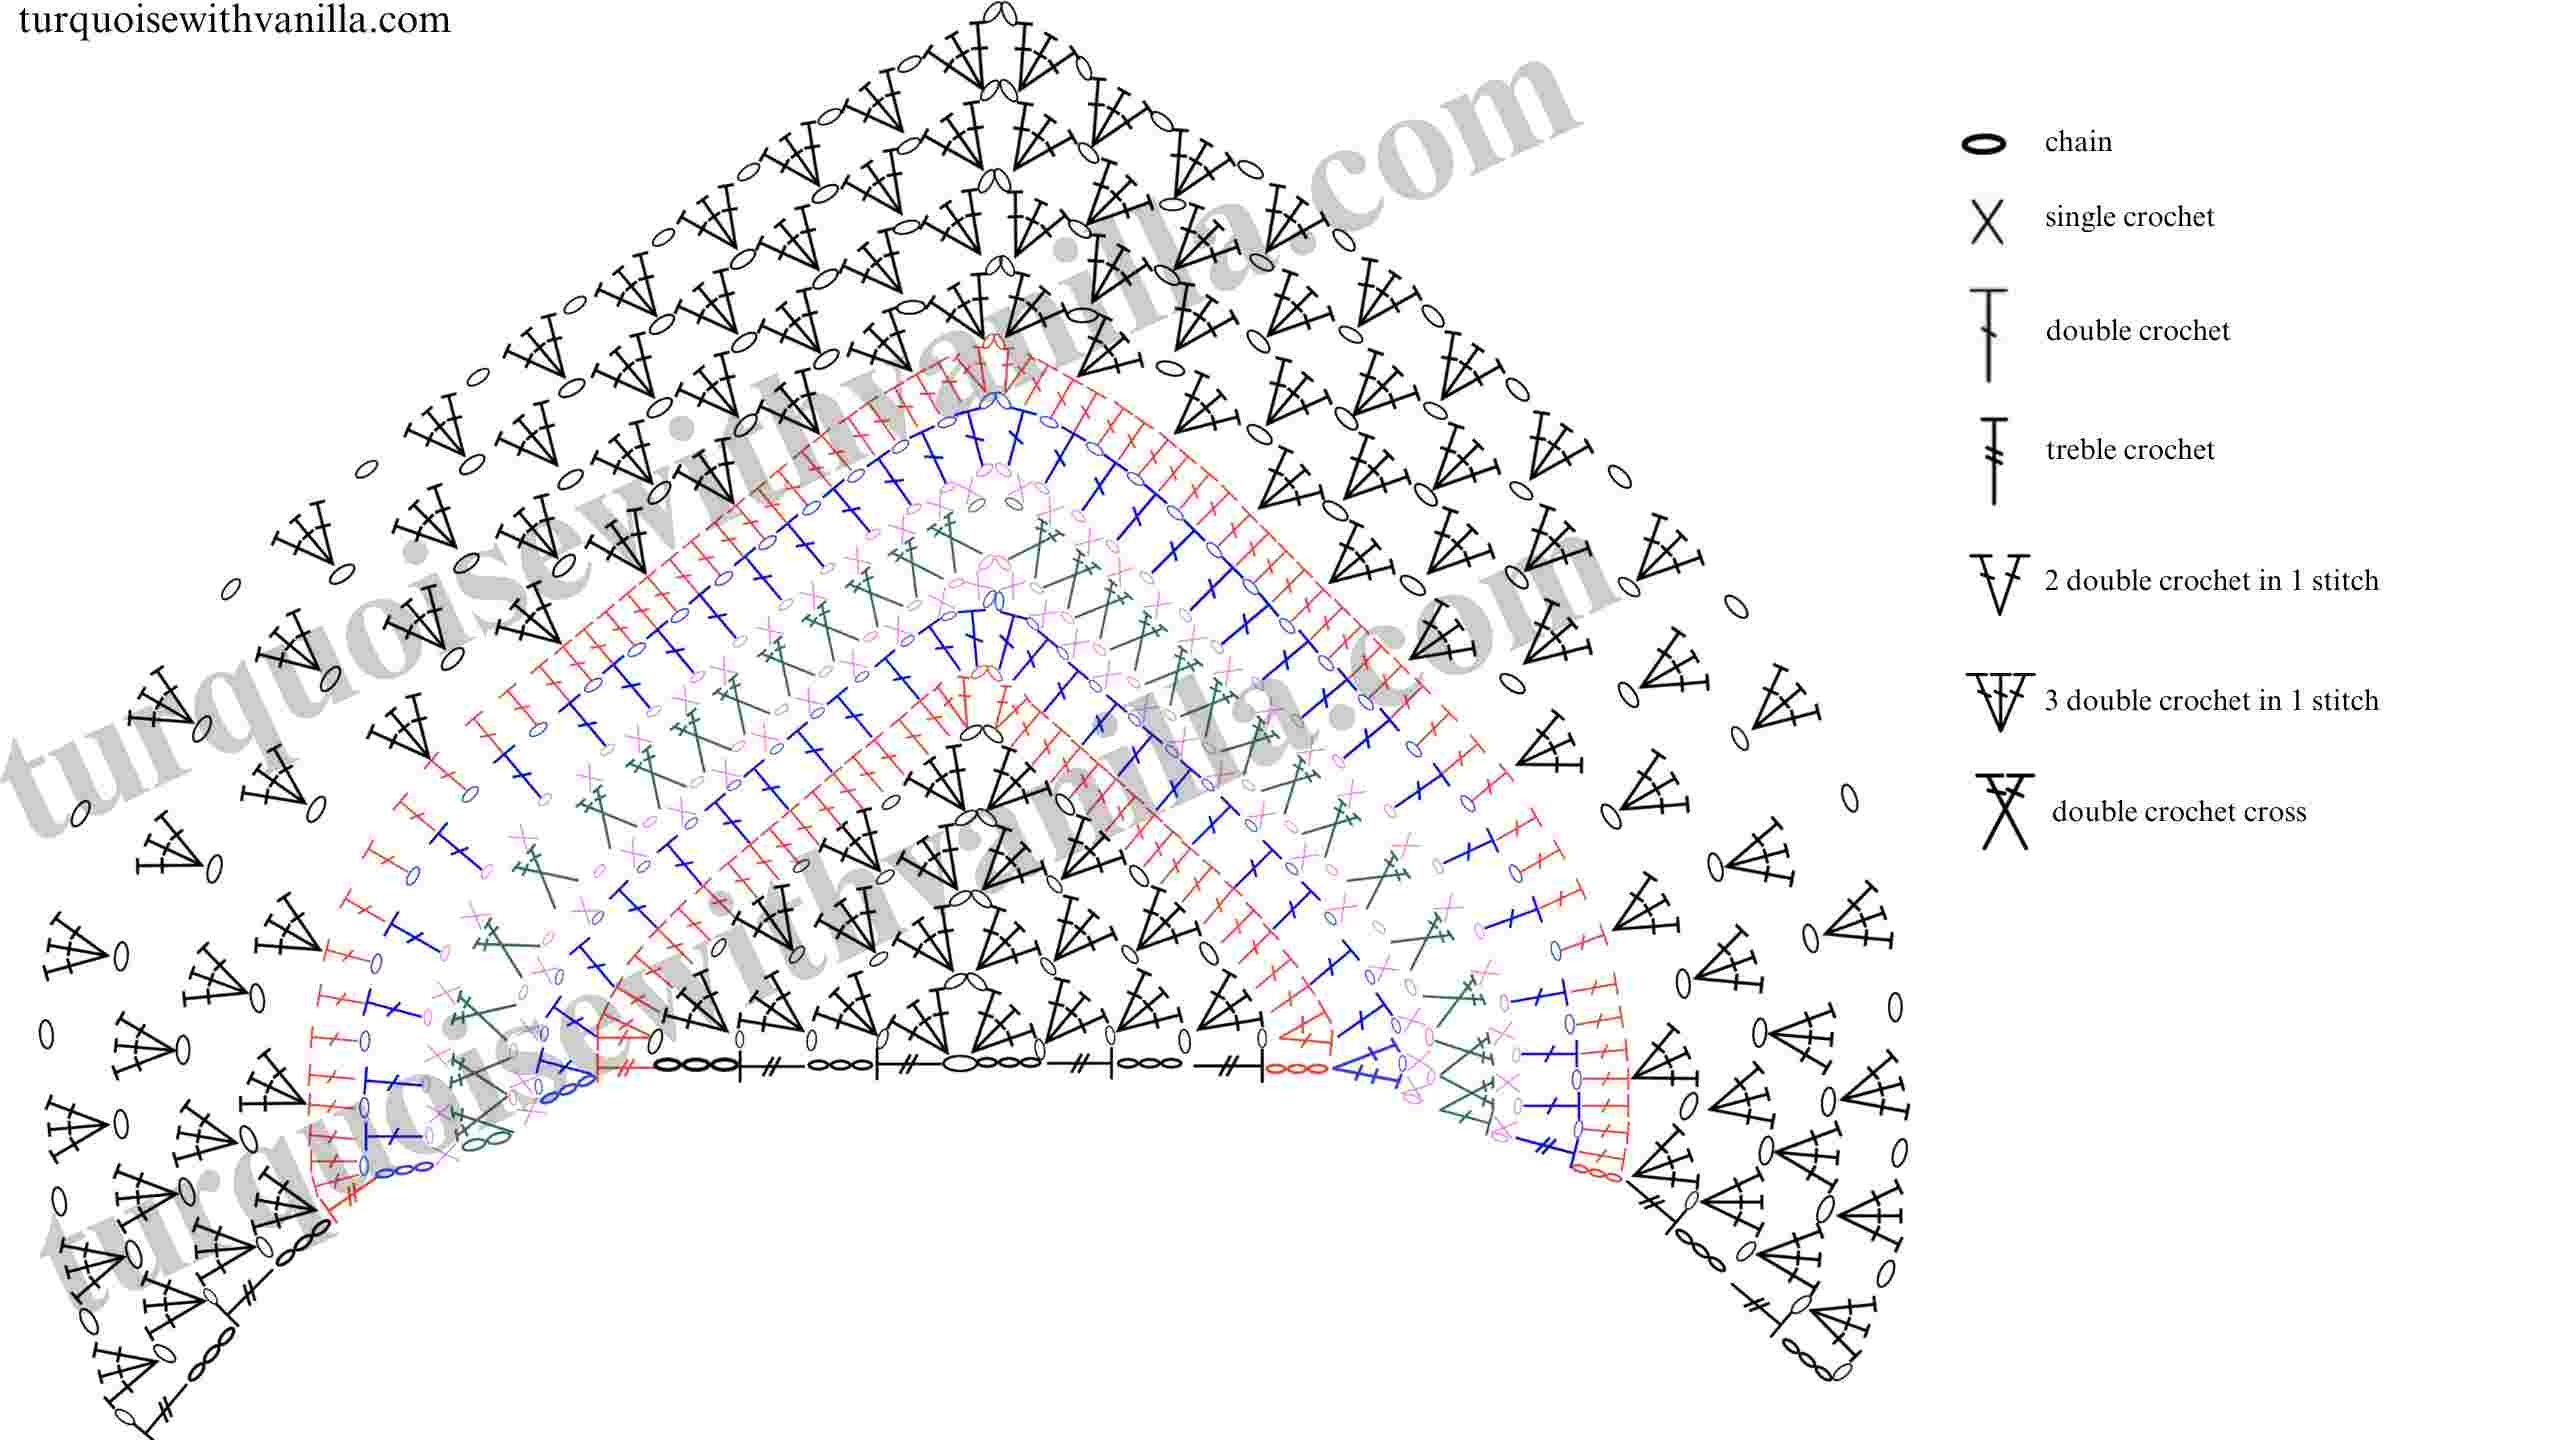
The written instructions:
Start with 5 chains.
1. Row 1: In the 5th ch from the hook crochet: 3 dc, 2 ch, 3 dc, ch, tc;
2. Row 2: ch 4; in the first ch space crochet 3 dc, ch. In the 2 ch space crochet: 3 dc, 2 ch, 3 dc; ch. In next ch space: 3 dc, ch, tc;
3. Row 3: ch 4; in the next two ch spaces crochet *3 dc, ch* for each ch space. In the 2 ch space crochet: 3 dc, 2 ch, 3 dc; ch. In the next two ch spaces crochet *3 dc, ch* for each ch space, tc in the last st.
4. Row 4: ch 4; in the next three ch spaces crochet *3 dc, ch* for each ch span In the next three ch spaces crochet *3 dc, ch* for each ch space, tc in the last st.
5. Row 5: ch 3 (count as a st); in the next ch space crochet 2 dc. Crochet 1 dc in each of the next st and ch spaces. In the 2 ch space crochet: 2 dc, 2 ch, 2 dc. Crochet 1 dc in each of the next st and ch spaces to the last ch space. In the last ch space crochet 2 dc and tc. You should have 40 sts (39 dc and 1 tc).
6. Row 6: ch 4 (count as a st); dc in the next st. Crochet ch, dc in the next stitch. *Skip 1 st and crochet ch, dc*. Repeat *-*to the 2 ch space and crochet: ch, dc, 2 ch, dc. Repeat *-*to the last stitch and crochet: ch, dc, ch, tc. You should have 26 sts (25 dc and 1 tc).
7. Row 7: ch, sc in the first stitch. *In each on the next ch space crochet: ch, sc* to the 2 ch space and crochet: ch, sc, 2 ch, sc. Repeat *-*to the last stitch. You should have in total 28 sc sts.
8. Row 8: ch 2 (count as a dc), dc cross (skip the first st and crochet the 1st dc in the next ch space, then crochet the 2nd dc over the 1st dc in the st you skipped). *Crochet dc cross (skip the next ch space and crochet the 1st dc in the next ch space and then the 2nd dc over the 1st dc in the skipped ch space) * to the 2 ch space and crochet 2 chains. Repeat *-* to the last ch space and crochet the dc cross as follows: skip the last ch space and crochet the dc in the last st, then crochet the 2nd dc in the skipped ch space; dc. You should have 28 dc cross stitches.
9. Row 9: ch 1; sc in the next st. *skip 1 st and crochet: ch, sc*. Repeat *-*to the 2 ch space and crochet: ch, sc, 2 ch, sc. In the next st crochet: ch, sc. Repeat *-* to the last st. You should have 32 sc sts.
10. Row 10: ch 4 (count as a st), dc in the next ch space. *In the next ch space crochet: ch, dc*. Repeat *-*to the 2 ch space and crochet: ch, dc, 2 ch, dc. Repeat *-* to the last ch space. Finish with a ch and tc in the last stitch. You should have 34 sts (33 dc and 1 tc).
11. Row 11: ch 3 (count as a dc), crochet a dc in the first dc. Crochet 1 dc in each of the next ch spaces and stitch. In the 2 ch space crochet: 2 dc, 2 ch, 2 dc. Crochet 1 dc in each of the next st and ch spaces to the last ch space. In the last ch space crochet 2 dc and tc. You should have 72 sts (71 dc and 1 tc).
12. Row 12: ch 4 (count as a dc), in the first st crochet 3 dc; *skip 3 st and crochet: ch, 3 dc *. Repeat *-* to the 2 ch space and crochet: ch, 3 dc, 2 ch, 3 dc. Repeat *-* to the last stitch. In the last st (in the same st you just crocheted the 3 dc) crochet ch, tc.
13. Row 13: ch 4 (count as a dc). *In the next ch space crochet: 3 dc, ch*. Repeat *-*to the 2 ch space crochet: 3 dc, 2 ch, 3 dc; ch. Repeat *-* to the last ch space. In the last st crochet tc.
14-15. Row 14-15: repeat row 12.
Repeat the pattern from row 5 until you have the dimension you want or until you finish the yarn.
Tie off and weave in the ends.
Here is a list of my other free patterns for scarves:
- Summer crochet scarf;
- Coffee break crochet scarf;
- Crochet Trinity Scarf;
- How to crochet a lace scarf;
- Wild Tulips crochet scarf;
- Autumn vibes crochet scarf;
- Sunny days crochet scarf;
- Deep Forest crochet scarf;
I recommend washing the Deep Forest crochet scarf by hand or in the washing machine at 40 degrees maximum. I prefer 20 degrees for all my crochet items. Dry flat or tumble dry in a cool setting. The scarf will smell and look better.
I hope you enjoyed making the Deep Forest crochet scarf. I can’t wait to see what colors you choose for your Deep Forest crochet scarf. Also, feel free to tag me when you share your project on Instagram or Facebook or you can use the hashtag #turquoisewithvanilla.
Follow my Facebook and Instagram pages to see my current projects.
Please also subscribe to my YouTube channel for my video tutorials: https://www.youtube.com/channel/UCUpzoP-RDaJV1_2kvJMh5QQ/videos
*Some links may be affiliate links, allowing me to earn a small commission on products purchased as a result of my recommendation. Please note that this does not influence my opinions or recommendations in any way.
Copyright 2019 Turquoise with Vanilla. All rights reserved. This pattern and photos of items on this site are the property of Julia Bleau @Turquoisewithvanilla. Please do not sell or claim this pattern as your own. The pattern is for personal use only and may not be translated or reproduced in another language. So please respect my rights and DO NOT share or publish this pattern anywhere without my permission. You can sell the items made with this pattern, but please credit Turquoise with vanilla as the designer.


[…] Deep Forest crochet scarf; […]
[…] How to crochet Deep Forest scarf; […]
[…] 5. How to crochet Deep Forest scarf; […]
Thank you for this pattern!
I’m new to crochet – how do you do a DC CROSS??
I get DC, but how do you “cross” them?
Thank you!
You’re welcome. This is how you crochet it: Skip one stitch and crochet a dc in the next stitch, then crochet a dc over the first dc in the st you skipped. Please read the written pattern, on the row 8 you can read exactly how to crochet this stitch for this pattern.
[…] 4. How to crochet Deep Forest scarf; […]
[…] 6. How to crochet Deep Forest scarf; […]
[…] 4. How to crochet Deep Forest scarf; […]
Kelly Davies
I can read charts but the chart doesn’t look like it shows how you repeat the pattern to the end. Do you use the same number of rows of each different stitch as shown in this chart?
The last row of the chart is the first row you start to repeat the pattern (row 12- you crochet it for 4 times), then you repeat rows 5-11.
I cannot read charts either and eould live a written pattern please.
I cannot read charts; do you have a written pattern for the shawl and rose?
I cannot read charts either! Written pattern please. This is lovely.
I can’t read the chart, either. Would love a pattern in text.